
Every high school senior reaches a moment when the weight of endings and beginnings collides. The final bell rings, caps fly, and suddenly, adolescence slips away. Creating a senior box offers a powerful way to honor that transition, preserving the sights, sounds, and emotions of your final year in a tangible, meaningful way.
This guide walks you through every step of making a professional-quality senior box, from choosing the right container to filling it with keepsakes that tell your unique story. You’ll learn the best materials, trending themes, budget tips, and long-term preservation strategies so your senior box becomes a cherished heirloom.
Choose the Right Box Base for Your Senior Box
The foundation of your senior box is the container itself. This choice impacts durability, customization potential, and how well your memories are protected over time.
Pick a Durable, Customizable Container
Select a box that balances sturdiness with creative flexibility. Consider these popular options:
• Wooden boxes with hinged lids are ideal for long-term preservation and accept paint, stains, and decoupage beautifully. They work well if you plan to pass the box down as a family heirloom.
• White gift boxes with magnetic lids offer a clean, modern look. These lightweight options are easy to decorate with stickers or paint and provide a sleek finish.
• Stackable plastic storage bins suit students who prefer function over flair. These are moisture-resistant, durable, and perfect for storing bulkier items like sports jerseys or yearbooks.
• Scalloped gift boxes with satin bows work great for group decorating parties. They’re festive, photo-ready, and budget-friendly.
Pro Tip: Avoid flimsy cardboard or paperboard boxes. They warp easily and don’t hold up over time.
Avoid Common Box Mistakes
Never underestimate the importance of a secure closure. A box that won’t stay shut risks losing precious contents. Choose options with magnetic seals, clasps, or snug-fitting lids. If using a wooden box, ensure the hinge is sturdy and the lid aligns perfectly.
Also, skip containers with textured surfaces unless you’re using adhesive materials designed for grip. Smooth finishes accept paint and stickers more evenly and reduce frustration during decoration.
Warning: Don’t close a freshly painted or glued box until everything is completely dry. This prevents sticking and smudging.
Gather Essential Materials and Supplies
Having the right tools makes all the difference between a frustrating process and a smooth creation. Organize your supplies into categories to streamline the process.
Stock Up on Adhesives and Fasteners
Choose your adhesive based on what you’re attaching:
• Hot glue gun works best for heavy or 3D elements like fur trim, artificial flowers, or bows.
• Double-sided tape provides a clean, mess-free option for photos, paper cutouts, and lightweight stickers.
• Craft glue (Mod Podge) is ideal for decoupage, sealing, and layering paper or fabric.
• Adhesive-backed items like pre-glued rhinestones, pearls, or sticker patches save significant time.
Pro Tip: Use hot glue sparingly on delicate surfaces. It can warp or burn thin cardboard.
Select Paints and Markers for Maximum Impact
Acrylic paints offer bold, opaque coverage and work on wood, plastic, and cardboard. Apply 2-4 thin coats for full opacity, letting each dry completely.
For precision work like lettering or outlines, acrylic paint markers are unbeatable. Their fine tips allow for clean lines and detailed designs. Popular colors include metallic gold, silver, and glitter-infused hues.
Use white chalk to sketch designs lightly before painting. It wipes away easily if you change your mind.
Don’t Skip the Embellishments
These elements transform a plain box into a personal masterpiece:
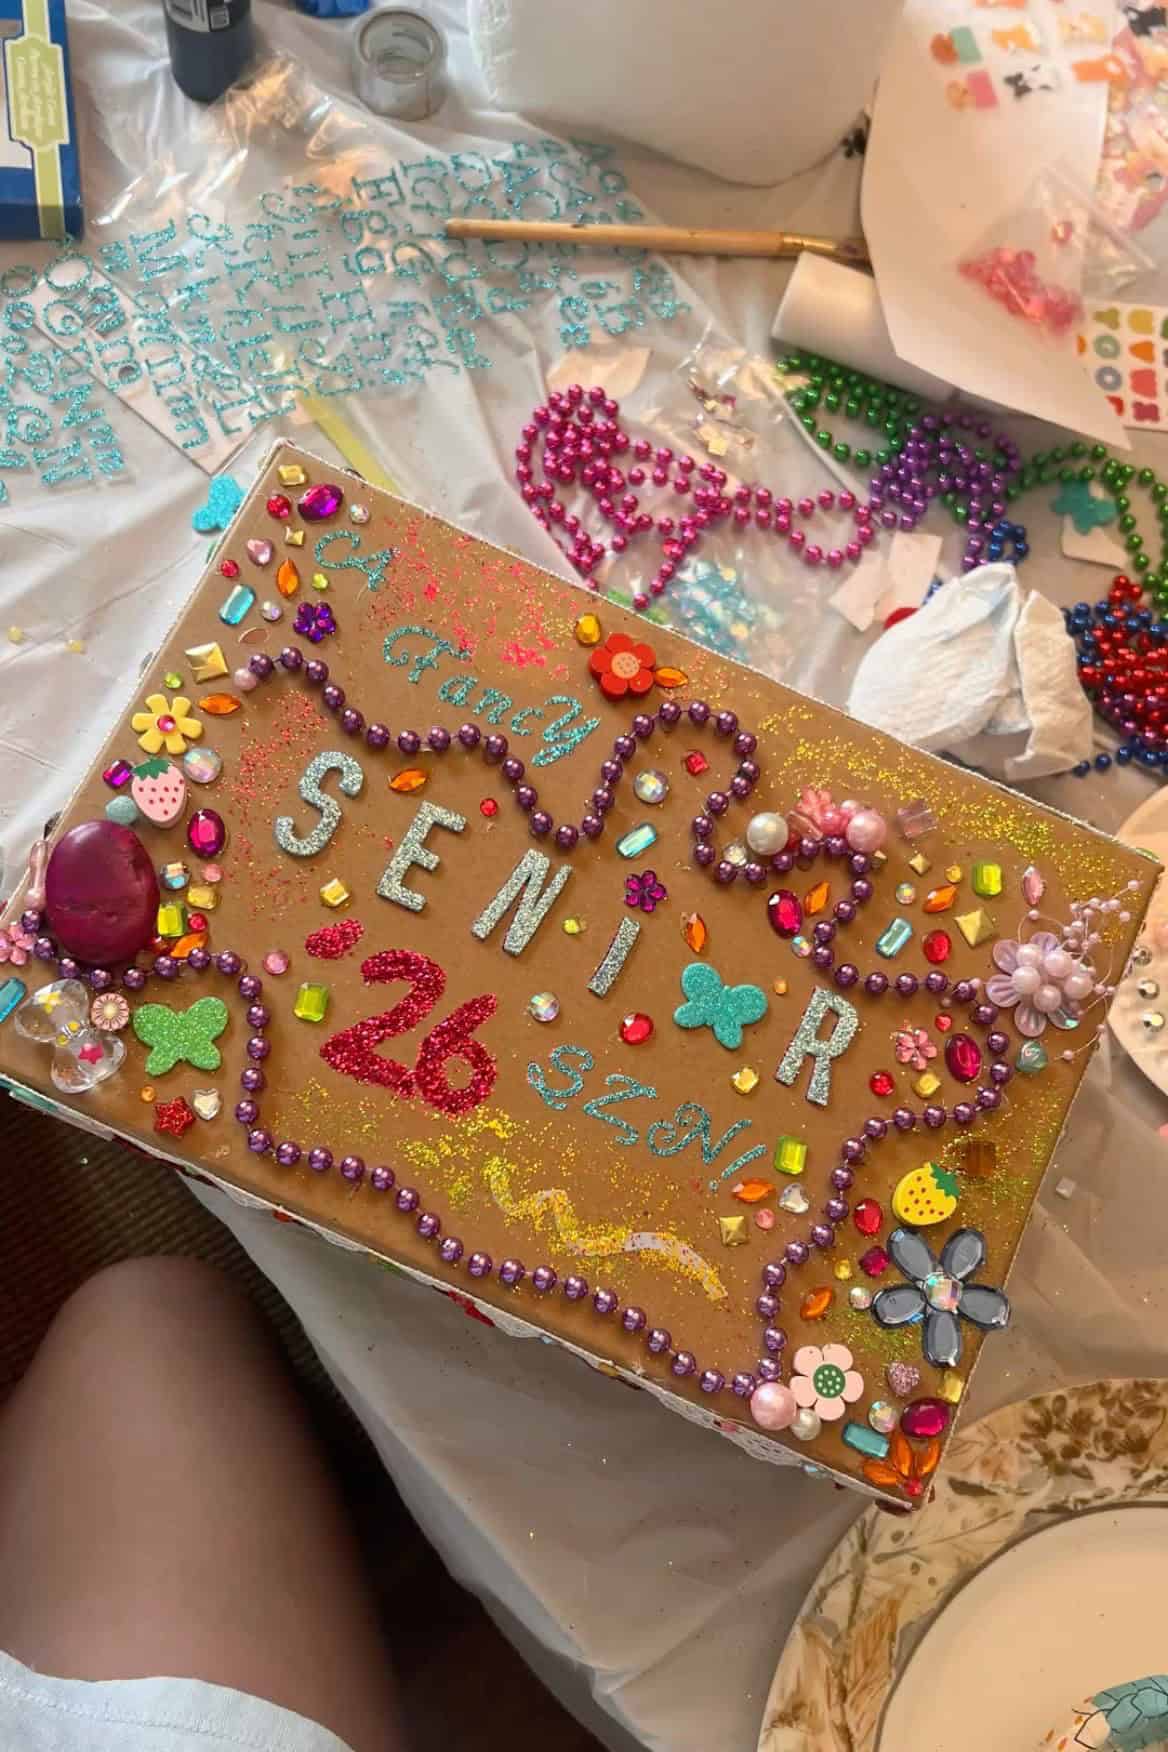
• Stickers: Vinyl alphabet sheets, chenille patches with your name or class year, and themed designs like butterflies, moons, or hearts add instant personality.
• Glitter: Apply over wet paint or adhesive for sparkle. Use fine glitter for subtle shimmer, chunky for drama.
• Rhinestones and pearls: Line the inner rim or border for a luxurious reveal when opened.
• Fur trim: Glue around the lid edge for a cozy, high-end look. Popular colors include pink, white, or ombre.
• Artificial flowers: Glitter them first for a “frosted” effect, then arrange on the lid.
Pro Tip: Buy extra sticker sheets. Students love trading at decorating parties.
Paint and Customize the Exterior

This is where your senior box starts to come alive. The exterior sets the tone, so choose colors and techniques that reflect your personality and theme.
Prep the Surface for Painting
If using a wooden box, lightly sand it with fine-grit sandpaper to smooth the surface and help paint adhere. Wipe away dust with a dry cloth. For cardboard or plastic, a quick wipe is enough.
Avoid painting over stickers or embellishments at this stage. Paint first, then decorate.
Apply a Professional-Quality Paint Finish
Pour acrylic paint onto a palette and use a foam or flat brush for even coverage. Start with the outside of the lid, then move to the sides.
Apply 2-4 thin coats, waiting 15-30 minutes between layers. Thick coats can drip or crack. Let the final coat dry completely before moving to the next step.
Color Tip: Choose a base color that contrasts with your planned stickers. Black works well with neon or metallic accents. White highlights glitter and pastels.
Add Stenciled Designs for Elegance
Use stencils to achieve crisp, polished results:
• Calligraphy stencils create elegant lettering for your name or “Class of 2025.”
• Wildflower stencils produce soft, nature-inspired backgrounds.
• Bow stencils add romantic, feminine flair.
Hold the stencil firmly and dab paint over it with a sponge or brush. Lift carefully to avoid smudging.
Pro Tip: Use Mod Podge to temporarily adhere stencils. This prevents slipping while you paint.
Attach 3D Embellishments and Details
Now it’s time to make your box pop. Three-dimensional elements add depth, texture, and that “wow” factor when someone opens it.
Glue Fur Trim for a Luxe Edge
Cut fur trim to fit the outer edge of the lid. Use hot glue for a strong hold, applying small dabs every inch. Press firmly as you go. White or pastel fur gives a soft, elegant look. Black or neon suits bolder themes.
Warning: Keep fur away from paint that isn’t fully dry. Heat from the glue gun can soften wet paint.
Bedazzle Flowers and Number Stickers
Create “frosted” effects by following these steps:
- Dip a paintbrush into white or metallic paint.
- Drizzle lightly over artificial flowers or butterfly stickers.
- Immediately sprinkle fine glitter while paint is wet.
- Let dry, then gently shake off excess.
Repeat this process with number stickers highlighting your graduation year. These become the focal point when centered on the lid.
Arrange and Secure Decorative Elements
Place embellishments before gluing to test your layout:
• Center the class year number.
• Flank with chenille patches representing sports, clubs, or your name.
• Scatter glittered butterflies or rhinestones for balance.
Once satisfied, glue each piece securely. Use hot glue for heavy items and double-sided tape for flat ones.
Pro Tip: Less is more. Avoid overcrowding. Leave breathing room for visual impact.
Decorate the Interior for a Surprise Reveal
The inside of your senior box should feel like a hidden treasure. When opened, it should delight with color, sparkle, and personal touches.
Paint and Glitter the Inner Surface
Use the same paint technique as the exterior. Choose a complementary or contrasting color. For example, a black exterior with gold interior creates dramatic impact.
While the paint is still wet, lightly sprinkle glitter across the base and inner walls. This creates a magical shimmer when the box is opened.
Caution: Don’t apply glitter too thickly. It can flake off over time.
Add Rhinestone and Pearl Accents
Glue rhinestone wrap along the inner rim of the box. This creates a glowing border under light. Alternatively, line the edge with adhesive pearl stickers for a classic, elegant look.
Place two butterfly stickers on the underside of the lid. Position them so they’re visible when closed. This adds a sweet surprise.
Create a Mini Diploma as a Focal Point
Fold a small piece of paper into a scroll:
- Cut copy paper to 4×6 inches.
- Roll tightly and secure with tape.
- Optional: Draw a seal or write “Graduated 2024.”
- Glue it beneath the butterflies on the inner lid.
Optional Upgrade: Tuck a handwritten letter to your future self underneath the diploma. Seal it in an envelope marked with a future date.
Fill the Box with Senior-Year Mementos
A beautiful box is meaningless without meaningful contents. Start early and add items throughout the year.
Collect Key Keepsakes
Begin gathering from day one:
• Event tickets: Prom, homecoming, concerts, games
• Photos: Senior portraits, candid friend pics, family moments
• Notes: Handwritten messages from friends, teachers, parents
• Awards: Ribbons, certificates, MVP trophies (mini versions)
• College items: Acceptance letters, campus maps, swag
• Dried flowers: Corsage, boutonniere, or bouquet petals
• Class memorabilia: Name tags, schedules, test papers with good grades
Pro Tip: Rotate items occasionally to relive memories during the year. Don’t wait until the end.
Include Symbolic and Future-Focused Items
Add layers of meaning to your box:
• Vision board cutouts: Dream colleges, travel destinations, career goals
• Scented stickers: Vanilla or coconut triggers sensory nostalgia
• Small trinkets: Keychain from a road trip, concert wristband
• List of “firsts”: First car, first kiss, first A in calculus
Idea: Use a mini journal to record reflections monthly.
Follow 2024-2026 Design Trends
Stay current with themes that resonate emotionally and aesthetically.
Choose a Trending Color Palette
• Purple: Royal and nostalgic, popular for Class of 2025
• Pink: Playful and bold, dominant in 2025-2026
• Blue: Calm and trustworthy, great with silver accents
• Green: Growth and renewal, ideal for nature lovers
Explore Popular Themes
| Theme | Key Features |
|---|---|
| School Spirit | Mascot, team colors, jersey patches |
| Minimalist | Clean lines, monochrome, magnetic white box |
| Boho/Nature | Wildflowers, earth tones, wood grain |
| Glamorous | Rhinestones, fur, glitter, gold dots |
| Taylor Swift-Themed | Lyrics, album names, “eras” references |
Pro Tip: Mix themes. For example, use a minimalist base with one bold embellishment.
Source Supplies from Trusted Retailers
Know where to shop for quality and affordability.
Shop at Craft and Big-Box Stores
• Michaels: Best for specialty stickers, stencils, Mod Podge, LED lights
• Hobby Lobby: Similar to Michaels, often with seasonal discounts
• Walmart/Target: Budget-friendly boxes, basic craft kits
• Dollar Tree: Cheap bows, stickers, small containers
• Amazon: Bulk chenille patches, rhinestone wraps, stencils
• Etsy: Custom engraved wooden boxes, pre-decorated options
Stock Alert: Some items sell out in summer. Order early to avoid delays.
Stick to a Realistic Budget
You don’t need to spend a fortune to make a meaningful senior box.
Estimate DIY vs. Pre-Made Costs
| Item | Cost |
|---|---|
| Wooden box | $8-$15 |
| Acrylic paint (50 colors) | $12-$18 |
| Sticker sheets (3 packs) | $15-$24 |
| Rhinestone wrap | $5 |
| Glue, brushes, tape | $10 |
| Total (DIY) | $25-$45 |
| Pre-made (Etsy) | $30-$70 |
Budget Hack: Host a supply-sharing party. Each family brings one item to share.
Ensure Long-Term Preservation
Your senior box should last decades, not just months.
Seal and Protect the Finish
After decorating, apply a clear acrylic spray or Mod Podge topcoat to protect against UV light, moisture, and fading. Do this in a well-ventilated area.
Pro Tip: Use UV-protective spray if storing near windows.
Store Properly for Future Opening
• Keep in a cool, dry place. Avoid attics or basements.
• Stay away from direct sunlight to prevent color fading.
• Use a plastic bin if in high-humidity areas.
• Label with name, year, and school.
Longevity: With proper care, your box can last 10+ years and even become a family heirloom.
Share the Experience and Make It Social
The process is just as important as the product.
Host a Senior Box Decorating Party
Invite friends over with supplies, music, and snacks. It becomes a bonding ritual with shared stories, traded stickers, and mutual encouragement.
Parent quote: “My daughter and her friends did their Senior Boxes today!”
Involve Family and Friends
Parents can help with setup or gifting the box. Teachers might organize class-wide memory projects. Let the student lead. This is their story to tell.
Golden Rule: Let kids lead the design. It’s their story.
Key Takeaways for Creating Your Perfect Senior Box
Creating a senior box is more than a craft project. It’s a ceremonial act of reflection, identity, and anticipation that preserves one of life’s most transformative chapters. Start by choosing a durable wooden box with a secure closure, then gather quality materials including acrylic paints, adhesive-backed embellishments, and plenty of stickers. Paint the exterior in a color that contrasts with your planned decorations, and add 3D elements like fur trim, glittered flowers, and your class year number as the focal point. Decorate the interior with complementary colors, glitter, and rhinestone accents for a surprise reveal. Fill the box throughout senior year with tickets, photos, notes, awards, and symbolic items that tell your unique story. With proper sealing and storage, your senior box will last 10+ years and become a cherished heirloom you can reopen on milestone anniversaries.
Frequently Asked Questions About Making a Senior Box
What is the best type of box for a senior box?
Wooden boxes with hinged lids offer the best durability and customization potential. They accept paint and decorations beautifully and can be passed down as family heirlooms. Avoid flimsy cardboard options that warp easily.
When should I start making my senior box?
Start creating your senior box early in your senior year. This gives you time to gather mementos throughout the year and allows for creative experimentation without rushing. One to two weeks before school starts gives you a good head start.
How much does it cost to make a senior box DIY?
A DIY senior box typically costs $25-$45 depending on material quality. This includes the box ($8-$15), paint ($12-$18), stickers and embellishments ($15-$24), and basic supplies like glue and brushes.
What items should I put in my senior box?
Include event tickets, photos, handwritten notes from friends and family, awards and certificates, college acceptance letters, dried flowers from prom, and symbolic items representing your hobbies and goals. Add a letter to your future self for extra meaning.
How do I preserve my senior box for years to come?
Apply a clear acrylic spray or Mod Podge topcoat to protect painted surfaces. Store in a cool, dry place away from direct sunlight. Use acid-free paper for letters and photos. Consider storing in a plastic bin in humid environments.
Can boys make senior boxes too?
Absolutely. Male students increasingly participate through sports-themed designs, minimalist black or team-colored boxes, gaming stickers, or functional plastic storage bins. The tradition welcomes any student wanting to preserve their senior year memories.